Remember when I mentioned that I had I bunch of projects that were sitting around, waiting for me to finish them? Well, I've been busting my hump trying to finish them up ... so that I can start something new without making my husband too terribly frustrated. I decided to start with the quickest one and go from there. And the quickest was this lamp.
I previously jazzed up the lamp by adding some ribbon at the bottom and at the top, and it was OK, but after awhile I just wasn't diggin' it anymore. I wanted to freshen it up, while not straying too far from the "Grandma" feel of the lamp.
I found this floral fabric on the clearance rack at Joann's and loved it instantly. It's a little bit Grandma and a little bit fun.
I also grabbed some adhesive spray from Joann's. There are a million different kinds; I just grabbed Aleene's for $5 with a coupon.
First step? Lay out your fabric so that you have about an inch or so overlay at the top, bottom, and each side. (Also, how cute is the back of the fabric? I love reversible things!) Spray the middle of your shade and plop it down on the middle of the fabric. Give it a few nice firm rubs to make sure that it sticks.
Spray the next section of the lamp and firmly pull the fabric around to cover the sprayed portion of the lamp. Again, give it a few good rubs.
Keep on spraying the shade, wrapping the fabric, and rubbing the fabric to get it nice and adhered.
When you've done all sides of the shade, feel around on it to make sure they're all nice and stuck. If you need to spray and rub a little more, go for it.
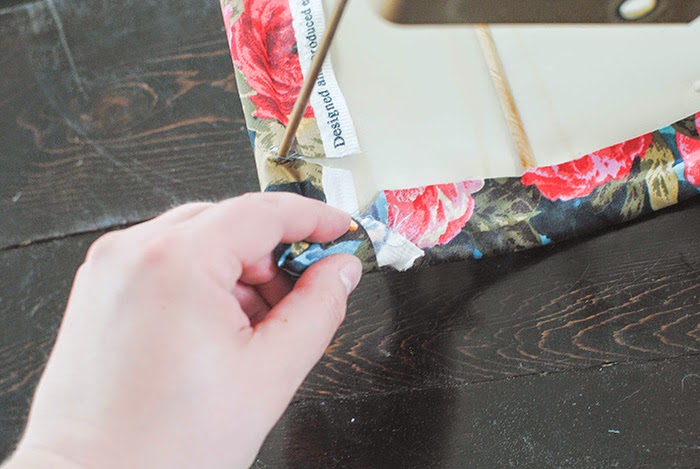
Now it's time tackle the edges. For my lamp, I needed to make a little slit in the fabric in order to wrap it around a piece of the frame. It was important not to clip it down too far so that the clipped part shows on the finished side of the shade.
The rest of this is a little messy. Truthfully, I should have gotten out the hot glue gun, but I was feeling lazy. Anyway, to adhere the edges of the fabric to the inside of the shade, I sprayed both the shade and the fabric.
Then I folded it over and gave it a good squeeze. This was sticky and took lots of squeezing, hence the reason I should have used the hot glue. But, it worked!
Then, on to the top and bottom using the same method - spray shade and fabric, fold over, press and hold.
Corners were pretty simple, but definitely would have been easier with hot glue.
Just wrap the corners like a present and secure. Using spray adhesive, this took a long time. Again, hot glue would have been way better!
And there she is. Isn't she pretty? For a minute I thought I put the fabric upside down on the shade, but I like that the roses look like they're falling down the shade.
You might remember this post, when I said that I was trying to figure out what to do with this lamp. While I loved the brass finish of the lamp, I wanted to make it feel a little younger, because ... it's a half lamp and it just felt old. So I gave it a coat of ORB spray paint.
Put together back on the wall, I love it. I'm a little sad that I covered the brass, but I love the total package. Like I said, it's the perfect combo of "Grandma" and "Fun".
If I decide that this is the place I want to leave the lamp, I might ask Brian to run the cord through the wall. But truthfully, it doesn't bother me.
It's just so much fun!!
I love how it adds a nice punch of color to the room. Such an easy project!
And maybe some day we'll actually get some baseboards! :D
Linking up to:
That DIY Party,
Home Stories A to Z,
Flamingo Toes,
The 36th Avenue,
My Fabuless Life,
Artsy-Fartsy Mama,
A Glimpse Inside,
The Chronicles of Home


.png&container=blogger&gadget=a&rewriteMime=image%2F*)


+-+adjusted+size.jpg)
.jpg)