Image Map
Image Map

Sunday, May 31, 2015

Project 365: Week 10

We had a crazy busy week, but also a crazy FUN week.  The nice weather has us soakin' up the sun and fresh air, and burnin' lots of energy!  

May 23 - Silly brothers.

May 24 - My Mr. Beckett.

May 25 - Cell phone pic by Brennan!

May 26 - My heart.

 May 27 - I've never EVER made chocolate chip cookies that look this good!

May 28 - Park fun.

May 29 - First base.

Thursday, May 28, 2015

Lamp revamp.


Remember when I mentioned that I had I bunch of projects that were sitting around, waiting for me to finish them?  Well, I've been busting my hump trying to finish them up ... so that I can start something new without making my husband too terribly frustrated.  I decided to start with the quickest one and go from there.  And the quickest was this lamp.  


I previously jazzed up the lamp by adding some ribbon at the bottom and at the top, and it was OK, but after awhile I just wasn't diggin' it anymore.  I wanted to freshen it up, while not straying too far from the "Grandma" feel of the lamp.


I found this floral fabric on the clearance rack at Joann's and loved it instantly.  It's a little bit Grandma and a little bit fun.


I also grabbed some adhesive spray from Joann's.  There are a million different kinds; I just grabbed Aleene's for $5 with a coupon.


First step?  Lay out your fabric so that you have about an inch or so overlay at the top, bottom, and each side.  (Also, how cute is the back of the fabric?  I love reversible things!)  Spray the middle of your shade and plop it down on the middle of the fabric.  Give it a few nice firm rubs to make sure that it sticks.


Spray the next section of the lamp and firmly pull the fabric around to cover the sprayed portion of the lamp.  Again, give it a few good rubs.


Keep on spraying the shade, wrapping the fabric, and rubbing the fabric to get it nice and adhered.


When you've done all sides of the shade, feel around on it to make sure they're all nice and stuck.  If you need to spray and rub a little more, go for it.


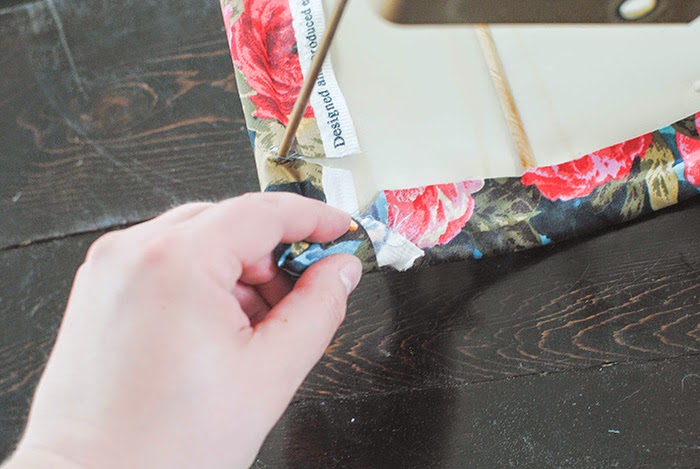
Now it's time tackle the edges.  For my lamp, I needed to make a little slit in the fabric in order to wrap it around a piece of the frame.  It was important not to clip it down too far so that the clipped part shows on the finished side of the shade.


The rest of this is a little messy.  Truthfully, I should have gotten out the hot glue gun, but I was feeling lazy.  Anyway, to adhere the edges of the fabric to the inside of the shade, I sprayed both the shade and the fabric.


Then I folded it over and gave it a good squeeze.  This was sticky and took lots of squeezing, hence the reason I should have used the hot glue.  But, it worked!


Then, on to the top and bottom using the same method - spray shade and fabric, fold over, press and hold.


Corners were pretty simple, but definitely would have been easier with hot glue.


Just wrap the corners like a present and secure.  Using spray adhesive, this took a long time.  Again, hot glue would have been way better!


And there she is.  Isn't she pretty?  For a minute I thought I put the fabric upside down on the shade, but I like that the roses look like they're falling down the shade.


You might remember this post, when I said that I was trying to figure out what to do with this lamp.  While I loved the brass finish of the lamp, I wanted to make it feel a little younger, because ... it's a half lamp and it just felt old.  So I gave it a coat of ORB spray paint.  


Put together back on the wall, I love it.  I'm a little sad that I covered the brass, but I love the total package.  Like I said, it's the perfect combo of "Grandma" and "Fun".  


If I decide that this is the place I want to leave the lamp, I might ask Brian to run the cord through the wall.  But truthfully, it doesn't bother me.


It's just so much fun!!


I love how it adds a nice punch of color to the room.  Such an easy project!


And maybe some day we'll actually get some baseboards!  :D


Linking up to:  That DIY PartyHome Stories A to ZFlamingo ToesThe 36th AvenueMy Fabuless LifeArtsy-Fartsy MamaA Glimpse InsideThe Chronicles of Home

Tuesday, May 26, 2015

Project 365: Week 9

This was a very heavy cell phone photo week, but that's better than no photos.  Life this week was chaotic, and I think the photos really reflect that.  That's part of what I love about a Project 365 though -- it reflects life!

May 16 - Soccer star.

May 17 - Wrestles.  Constant wrestles.

May 18 - Donut date.

May 19 - Fancy haircut.

May 20 - Life.  

May 21 - Daddy snuggles.

May 22 - Cedar Point selfie.  

Monday, May 18, 2015

Project 365: Week 8

I took a few really awesome photos this week and a few last minute not-so-wonderful ones.  Ah well. 

One of my faves is Kiernan standing on the back of a fire truck.  We went to a "Touch a Truck" festival and the boys had an amazing time.  I just love, love, love this photo of him, with his sunglasses, fire hat, balloon, and big grin.  Too cute for words.  

My other fave is the black and white photo of Brennan.  I noticed some awesome light coming in the dining room window and asked him to stand next to the window for me.  He informed me that he would not be smiling and would instead use his serious face.  Fine by me, sweet kiddo!  I took a whole slew of cute photos of him, but this was my favorite.  Enjoy!

May 9 - Fireman Kiernan.

May 10 - Frosting fingers.

May 11 - Real life.

May 12 - Tulips.

May 13 - Messing around with the macro.

May 14 - Sweet serious face.

May 15 - Coffee & a good book.

Wednesday, May 13, 2015

My Fave Home Decor Blogs {Part 2}.

Alright, round 2!  I hope you enjoyed Part 1 of my Fave Home Decor Blogs.  I have more eye candy for you today!

Beneath My Heart

Traci from Beneath My Heart seems like one of the sweetest people on earth.  Honestly, she's just someone that I can picture myself meeting for coffee and losing track of time with all of our chatter.  But beyond that, her house is just beautiful.  Traci's style is warm, welcoming, and comfortable.  She has a very talented handy hubby, and the two of them have transformed their home into a really beautiful space.

via Beneath My Heart

Traci is another fellow boy mom.  One thing I love about her style is that she has created some really awesome spaces for her boys that are really well styled, but also really practical for boys.  The spaces she creates aren't stuffy or over-styled, and they look like they can withstand ... boys.  :)  

2014-02-23-17.56.25_thumb
via Beneath My Heart


Have you stopped over at Inspired by Charm?  Because Michael's house is adorable.  No, really, adorable.  There is just so much to look at, and yet it's not overwhelming or cluttered in the least.  There's brass and animals and color and greenery and lots of gorgeous white trim, and it all works together beautifully!  

Spring Home Tour | Inspired by Charm
via Inspired by Charm

One of my very favorite parts of his home are the light fixtures.  They're so much fun, and modern without straying from the vintage charm of the house.  And this view from the entryway into Michael's dining room is just awesome.  There are cool tones and warm tones, modern touches with vintage touches, and neutrals with pops of color.  It makes me miss our old house a bit and almost wish that we'd had the guts to paint the wood trim.  Almost.  

Spring Home Tour | Inspired by Charm

I love the idea of being organized.  I'm not very good at keeping things organized, but I want to be.  So when I first stumbled on Jen's blog I was so excited to find someone who could make organizing look easy.  But it turns out that Jen is not only a great organizer, but an awesome designer as well.  She and her hubby recently ripped out a bunch of walls in the main living space of their home and have been transforming it into an even more beautiful space than it was.  Take a peek at her newly revealed living space ...


via iHeart Organizing

Gorgeous, right?  Words cannot describe how much I love it.  The built-ins are classic, the room is mainly neutral, but with lots of pops of color.  It looks so cozy.  Jen is yet another fellow boy mom, and I have a major, major crush on her studio space.  There are just enough feminine touches in there to clearly see her stamp in there, and yet it isn't un-inviting to the men in her life.  So, so pretty!


via iHeart Organizing


Last, but definitely not least, is my very favorite in the history of ever, John & Sherry from Young House Love.  I put them last because they hung up their blogging hats and are no longer updating their blog.  I am not exaggerating when I say that the day they announced their blog hiatus was a supremely sad day.  


via Young House Love

There's something so fun and effortless about their style.  It's my favorite combo of light, bright, and airy with plenty of pops of color.  John & Sherry have redone 2 homes and a model house, and are currently working on their third home.  When you wander through the house tours on their blog, there is just endless amounts of awesome.  


via Young House Love

One thing I love about John & Sherry is that they put a lot of thought into their design choices.  They decorate in stages, by making small changes first that fit their budget and make the house a little more pleasant to live in.  And when they have lived in the home and have the budget, they progress into further remodel stages.  They also keep it real by keeping their kiddos in mind when planning their spaces.  The spaces that John & Sherry create are just wonderful.  I have no better words for it!  

HouseTourOffice
via Young House Love

Welp, that's all I have for you for now!  Do yourself a favor and go scroll through a few of these blogs.  You can thank me later.  :D